33 KiB
Quick start
Hey, you say you've never heard about Beego and don't know how to use it? Don't worry, after you read this section, you will know a lot about Beego. Before you start reading, make sure you installed Beego in your computer, if not, check this tutorial: Installation
Navigation
- Hello world
- New project
- Development mode
- Router
- Static files
- Filter and middleware
- Controller
- Template
- Handle request
- Redirect and error
- Handle response
- Sessions
- Cache
- Safe map
- Log
- Configuration
- Beego arguments
- Integrated third-party applications
- Deployment
Hello world
This is an example of "Hello world" in Beego:
package main

import (
	"github.com/astaxie/beego"
)

type MainController struct {
	beego.Controller
}

func (this *MainController) Get() {
	this.Ctx.WriteString("hello world")
}

func main() {
	beego.Router("/", &MainController{})
	beego.Run()
}
Save file as "hello.go", build and run it:
$ go build main.go
$ ./hello
Open address http://127.0.0.1:8080 in your browser and you will see "hello world".
What happened in behind above example?
-
We import package
github.com/astaxie/beego. As we know that Go initialize packages and runs init() function in every package (more details), so Beego initializes the BeeApp application at this time. -
Define controller. We define a struct called
MainControllerwith a anonymous fieldbeego.Controller, so theMainControllerhas all methods thatbeego.Controllerhas. -
Define RESTful methods. Once we use anonymous combination,
MainControllerhas already hadGet,Post,Delete,Putand other methods, these methods will be called when user sends corresponding request, likePostmethod for requests that are using POST method. Therefore, after we overloadedGetmethod inMainController, all GET requests will useGetmethod inMainControllerinstead of inbeego.Controller. -
Define main function. All applications in Go use main function as entry point as C does.
-
Register routers, it tells Beego which controller is responsibility for specific requests. Here we register
/forMainController, so all requests in/will be handed toMainController. Be aware that the first argument is the path and the second one is pointer of controller that you want to register. -
Run application in port 8080 as default, press
Ctrl+cto exit.
New project
Get into your $GOPATH, then use following command to setup Beego project:
bee new hello
It generates folders and files for your project, directory structure as follows:
.
├── conf
│   └── app.conf
├── controllers
│   └── default.go
├── main.go
├── models
├── static
│   ├── css
│   ├── img
│   └── js
└── views
    └── index.tpl
Development mode
Beego uses development mode as default, you can use following code to change mode in your application:
beego.RunMode = "prod"
Or use configuration file in conf/app.conf, and input following content:
runmode = prod
No differences between two ways.
In development mode, you have following effects:
-
If you don't have directory
views, it prints following error prompt:2013/04/13 19:36:17 [W] [stat views: no such file or directory] -
It doesn't cache template and reload every time.
-
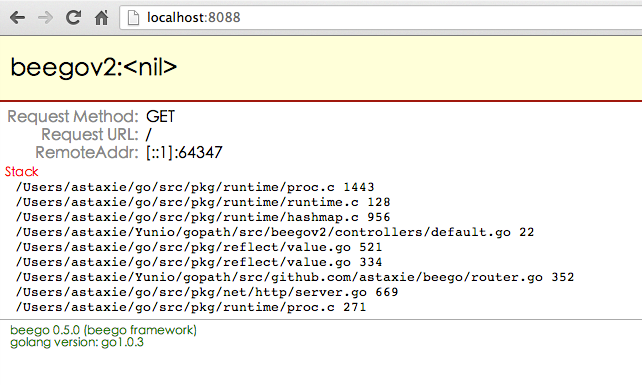
If panic occurs in your server, it prints information like following screen shot:
Router
The main function of router is to connect request URL and handler. Beego wrapped Controller, so it connects request URL and ControllerInterface. The ControllerInterface has following methods:
type ControllerInterface interface {
	Init(ct *Context, cn string)
	Prepare()
	Get()
	Post()
	Delete()
	Put()
	Head()
	Patch()
	Options()
	Finish()
	Render() error
}
beego.Controller implemented all of them, so you just use this struct as anonymous field in your controller struct. Of course you have to overload corresponding methods for more specific usages.
Users can use following ways to register route rules:
beego.Router("/", &controllers.MainController{})
beego.Router("/admin", &admin.UserController{})
beego.Router("/admin/index", &admin.ArticleController{})
beego.Router("/admin/addpkg", &admin.AddController{})
For more convenient configure route rules, Beego references the idea from sinatra, so it supports more kinds of route rules as follows:
-
beego.Router("/api/:id([0-9]+)", &controllers.RController{})
Customized regular expression match // match /api/123 :id= 123 -
beego.Router("/news/:all", &controllers.RController{})
Match rest of all // match /news/path/to/123.html :all= path/to/123.html -
beego.Router("/user/:username([\w]+)", &controllers.RController{})
Regular expression // match /user/astaxie :username = astaxie -
beego.Router("/download/
*.*", &controllers.RController{})Wildcard character // match /download/file/api.xml :path= file/api :ext=xml -
beego.Router("/download/ceshi/
*", &controllers.RController{})wildcard character match rest of all // match /download/ceshi/file/api.json :splat=file/api.json -
beego.Router("/🆔int", &controllers.RController{})
Match type int // match :id is int type, Beego uses regular expression ([0-9]+) automatically -
beego.Router("/:hi:string", &controllers.RController{})
Match type string // match :hi is string type, Beego uses regular expression ([\w]+) automatically
Static files
Go provides http.ServeFile for static files, Beego wrapped this function and use following way to register static file folder:
beego.SetStaticPath("/static","public")
- The first argument is the path of your URL.
- The second argument is the directory in your application path.
Beego supports multiple static file directories as follows:
beego.SetStaticPath("/images","images")
beego.SetStaticPath("/css","css")
beego.SetStaticPath("/js","js")
After you setting static directory, when users visit /images/login/login.png,Beego accesses images/login/login.png in related to your application directory. One more example, if users visit /static/img/logo.png, Beego accesses file public/img/logo.png.
Filter and middleware
Beego supports customized filter and middleware, such as security verification, force redirect, etc.
Here is an example of verify user name of all requests, check if it's admin.
var FilterUser = func(w http.ResponseWriter, r *http.Request) {
	if r.URL.User == nil || r.URL.User.Username() != "admin" {
		http.Error(w, "", http.StatusUnauthorized)
	}
}

beego.Filter(FilterUser)
You can also filter by arguments:
beego.Router("/:id([0-9]+)", &admin.EditController{})
beego.FilterParam("id", func(rw http.ResponseWriter, r *http.Request) {
	dosomething()
})
Filter by prefix is also available:
beego.FilterPrefixPath("/admin", func(rw http.ResponseWriter, r *http.Request) {
	dosomething()
})
Controller
Use beego.controller as anonymous in your controller struct to implement the interface in Beego:
type xxxController struct {
	beego.Controller
}
beego.Controller implementedbeego.ControllerInterface, beego.ControllerInterface defined following methods:
-
Init(ct
*Context, cn string)Initialize context, controller's name, template's name, and container of template arguments
-
Prepare()
This is for expend usages, it executes before all the following methods. Users can overload this method for verification for example.
-
Get()
This method executes when client sends request as GET method, 403 as default status code. Users overload this method for customized handle process of GET method.
-
Post()
This method executes when client sends request as POST method, 403 as default status code. Users overload this method for customized handle process of POST method.
-
Delete()
This method executes when client sends request as DELETE method, 403 as default status code. Users overload this method for customized handle process of DELETE method.
-
Put()
This method executes when client sends request as PUT method, 403 as default status code. Users overload this method for customized handle process of PUT method.
-
Head()
This method executes when client sends request as HEAD method, 403 as default status code. Users overload this method for customized handle process of HEAD method.
-
Patch()
This method executes when client sends request as PATCH method, 403 as default status code. Users overload this method for customized handle process of PATCH method.
-
Options()
This method executes when client sends request as OPTIONS method, 403 as default status code. Users overload this method for customized handle process of OPTIONS method.
-
Finish()
This method executes after corresponding method finished, empty as default. User overload this method for more usages like close database, clean data, etc.
-
Render() error
This method is for rendering template, it executes automatically when you set beego.AutoRender to true.
Overload all methods for all customized logic processes, let's see an example:
type AddController struct {
	beego.Controller
}

func (this *AddController) Prepare() {

}

func (this *AddController) Get() {
	this.Data["content"] = "value"
	this.Layout = "admin/layout.html"
	this.TplNames = "admin/add.tpl"
}

func (this *AddController) Post() {
	pkgname := this.GetString("pkgname")
	content := this.GetString("content")
	pk := models.GetCruPkg(pkgname)
	if pk.Id == 0 {
		var pp models.PkgEntity
		pp.Pid = 0
		pp.Pathname = pkgname
		pp.Intro = pkgname
		models.InsertPkg(pp)
		pk = models.GetCruPkg(pkgname)
	}
	var at models.Article
	at.Pkgid = pk.Id
	at.Content = content
	models.InsertArticle(at)
	this.Ctx.Redirect(302, "/admin/index")
}
Template
Template directory
Beego uses views as the default directory for template files, parses and caches them as needed(cache is not enable in develop mode), but you can change(because only one directory can be used for template files) its directory using following code:
beego.ViewsPath = "/myviewpath"
Auto-render
You don't need to call render function manually, Beego calls it automatically after corresponding methods executed. If your application is somehow doesn't need templates, you can disable this feature either in code of main.go or configuration file.
To disable auto-render in configuration file:
autorender = false
To disable auto-render in main.go(before you call beego.Run() to run the application):
beego.AutoRender = false
Template data
You can use this.Data in controller methods to access the data in templates. Suppose you want to get content of {{.Content}}, you can use following code to do this:
this.Data["Content"] = "value"
Template name
Beego uses built-in template engine of Go, so there is no different in syntax. As for how to write template file, please visit Template tutorial.
Beego parses template files in viewpath and render it after you set the name of the template file in controller methods. For example, Beego finds the file add.tpl in directory admin in following code:
this.TplNames = "admin/add.tpl"
Beego supports two kinds of extensions for template files, which are tpl and html, if you want to use other extensions, you have to use following code to let Beego know:
beego.AddTemplateExt("<your template file extension>")
If you enabled auto-render and you don't tell Beego which template file you are going to use in controller methods, Beego uses following format to find the template file if it exists:
c.TplNames = c.ChildName + "/" + c.Ctx.Request.Method + "." + c.TplExt
Which is <corresponding controller name>/<request method name>.<template extension>. For example, your controller name is AddController and the request method is POST, and the default file extension is tpl, so Beego will try to find file /<viewpath>/AddController/POST.tpl.
Layout design
Beego supports layout design, which means if you are working on an administration application, and some part of its user interface is exactly same all the time, then you can make this part as a layout.
this.Layout = "admin/layout.html"
this.TplNames = "admin/add.tpl"
You have to set following variable in order to make Beego possible to insert your dynamic content:
{{.LayoutContent}}
Beego parses template file and assign content to LayoutContent, and render them together.
Right now, Beego caches all template files, so you can use following way to implement another kind of layout:
{{template "header.html"}}
Handle logic
{{template "footer.html"}}
Template function
Beego supports customized template functions that are registered before you call beego.Run().
func hello(in string)(out string){
	out = in + "world"
	return
}

beego.AddFuncMap("hi",hello)
Then you can use this function in your template files:
{{.Content | hi}}
There are some built-in template functions:
-
markdown
This function converts markdown content to HTML format, use {{markdown .Content}} in template files.
-
dateformat
This function converts time to formatted string, use {{dateformat .Time "2006-01-02T15:04:05Z07:00"}} in template files.
-
date
This function implements date function like in PHP, use formatted string to get corresponding time, use {{date .T "Y-m-d H:i:s"}} in template files.
-
compare
This functions compares two objects, returns true if they are same, false otherwise, use {{compare .A .B}} in template files.
-
substr
This function cuts out string from another string by index, it supports UTF-8 characters, use {{substr .Str 0 30}} in template files.
-
html2str
This function escapes HTML to raw string, use {{html2str .Htmlinfo}} in template files.
-
str2html
This function outputs string in HTML format without escaping, use {{str2html .Strhtml}} in template files.
-
htmlquote
This functions implements basic HTML escape, use {{htmlquote .quote}} in template files.
-
htmlunquote
This functions implements basic invert-escape of HTML, use {{htmlunquote .unquote}} in template files.
Handle request
We always need to get data from users, including methods like GET, POST, etc. Beego parses these data automatically, and you can access them by following code:
- GetString(key string) string
- GetInt(key string) (int64, error)
- GetBool(key string) (bool, error)
Usage example:
func (this *MainController) Post() {
	jsoninfo := this.GetString("jsoninfo")
	if jsoninfo == "" {
		this.Ctx.WriteString("jsoninfo is empty")
		return
	}
}
If you need other types that are not included above, like you need int64 instead of int, then you need to do following way:
func (this *MainController) Post() {
	id := this.Input().Get("id")
	intid, err := strconv.Atoi(id)
}
To use this.Ctx.Request for more information about request, and object properties and method please read Request
File upload
It's very easy to upload file through Beego, but don't forget to add enctype="multipart/form-data" in your form, otherwise the browser will not upload anything.
Files will be saved in memory, if the size is greater than cache memory, the rest part will be saved as temporary file. The default cache memory is 64 MB, and you can use following ways to change this size.
In code:
beego.MaxMemory = 1<<22
In configuration file:
maxmemory = 1<<22
Beego provides two convenient functions to upload files:
-
GetFile(key string) (multipart.File,
*multipart.FileHeader, error)This function is mainly used to read file name element
the_filein form and returns corresponding information. You can use this information either filter or save files. -
SaveToFile(fromfile, tofile string) error
This function a wrapper of GetFile and gives ability to save file.
This is an example to save file that is uploaded:
func (this *MainController) Post() {
	this.SaveToFile("the_file","/var/www/uploads/uploaded_file.txt"")
}
Output Json and XML
Beego considered API function design at the beginning, and we often use Json or XML format data as output. Therefore, it's no reason that Beego doesn't support it:
Set content-type to application/json for output raw Json format data:
func (this *AddController) Get() {
	mystruct := { ... }
	this.Data["json"] = &mystruct
	this.ServeJson()
}
Set content-type to application/xml for output raw XML format data:
func (this *AddController) Get() {
	mystruct := { ... }
	this.Data["xml"]=&mystruct
	this.ServeXml()
}
Redirect and error
You can use following to redirect:
func (this *AddController) Get() {
	this.Redirect("/", 302)
}
You can also throw an exception in your controller as follows:
func (this *MainController) Get() {
	this.Abort("401")
	v := this.GetSession("asta")
	if v == nil {
		this.SetSession("asta", int(1))
		this.Data["Email"] = 0
	} else {
		this.SetSession("asta", v.(int)+1)
		this.Data["Email"] = v.(int)
	}
	this.TplNames = "index.tpl"
}
Then Beego will not execute rest code of the function body when you call this.Abort("401"), and gives following default page view to users:

Beego supports following error code: 404, 401, 403, 500 and 503, you can customize your error handle, for example, use following code to replace 404 error handle process:
func page_not_found(rw http.ResponseWriter, r *http.Request) {
	t, _ := template.New("beegoerrortemp").ParseFiles(beego.ViewsPath + "/404.html")
	data := make(map[string]interface{})
	data["content"] = "page not found"
	t.Execute(rw, data)
}

func main() {
	beego.Errorhandler("404", page_not_found)
	beego.Router("/", &controllers.MainController{})
	beego.Run()
}
You may be able to use your own 404.html for your 404 error.
Beego also gives you ability to modify error message that shows on the error page, the following example shows how to set more meaningful error message when database has problems:
func dbError(rw http.ResponseWriter, r *http.Request) {
	t, _ := template.New("beegoerrortemp").ParseFiles(beego.ViewsPath + "/dberror.html")
	data := make(map[string]interface{})
	data["content"] = "database is now down"
	t.Execute(rw, data)
}

func main() {
	beego.Errorhandler("dbError", dbError)
	beego.Router("/", &controllers.MainController{})
	beego.Run()
}
After you registered this customized error, you can use this.Abort("dbError") for any database error in your applications.
Handle response
There are some situations that you may have in response:
-
Output template
I've already talked about template above, Beego outputs template after corresponding method executed.
-
Redirect
You can use this.Redirect("/", 302) to redirect page.
-
Output string
Sometimes we just need to print string on the screen:
this.Ctx.WriteString("ok")
Sessions
Beego has a built-in session module and supports four engines, including memory, file, MySQL and redis. You can implement your own engine based on the interface.
It's easy to use session in Beego, use following code in your main() function:
beego.SessionOn = true
Or use configuration file:
sessionon = true
The following example shows you how to use session in Beego:
func (this *MainController) Get() {
	v := this.GetSession("asta")
	if v == nil {
		this.SetSession("asta", int(1))
		this.Data["num"] = 0
	} else {
		this.SetSession("asta", v.(int)+1)
		this.Data["num"] = v.(int)
	}
	this.TplNames = "index.tpl"
}
We can see that there are few convenient methods:
- SetSession(name string, value interface{})
- GetSession(name string) interface{}
- DelSession(name string)
There are three kinds of operation for session: set, get, and delete.
Of course you can use following code to customized session logic:
sess:=this.StartSession()
defer sess.SessionRelease()
The sess object has following methods:
- sess.Set()
- sess.Get()
- sess.Delete()
- sess.SessionID()
However, I recommend you to use SetSession、GetSession、DelSession these three operations in order to prevent resource leak.
There are some arguments you can use in session module:
-
SessionOn
Whether enable session or not, default is false, corresponding arguments in configuration file: sessionon.
-
SessionProvider
Setting session engine, default is memory, other options are file, MySQL and redis, corresponding arguments in configuration file: sessionprovider.
-
SessionName
Setting name of cookies, it saves in users' browser with name beegosessionID, corresponding arguments in configuration file: sessionname.
-
SessionGCMaxLifetime
Setting session expired time, default is 3600 seconds, corresponding arguments in configuration: sessiongcmaxlifetime
-
SessionSavePath
Setting save path or link address of corresponding file, MySQL and redis engines, default is empty, corresponding arguments in configuration file: sessionsavepath
When the SessionProvider is file, SessionSavePath saves file path:
beego.SessionProvider = "file"
beego.SessionSavePath = "./tmp"
When the SessionProvider is mysql, SessionSavePath is link address, it uses driver go-sql-driver:
beego.SessionProvider = "mysql"
beego.SessionSavePath = "username:password@protocol(address)/dbname?param=value"
When the SessionProvider is redis, SessionSavePath is link address of redis, it uses driver redigo:
beego.SessionProvider = "redis"
beego.SessionSavePath = "127.0.0.1:6379"
Cache
Beego has a built-in cache module, it's like memcache, which caches data in memory. Here is an example of using cache module in Beego:
var (
	urllist *beego.BeeCache
)

func init() {
	urllist = beego.NewBeeCache()
	urllist.Every = 0 // Not expired
	urllist.Start()
}

func (this *ShortController) Post() {
	var result ShortResult
	longurl := this.Input().Get("longurl")
	beego.Info(longurl)
	result.UrlLong = longurl
	urlmd5 := models.GetMD5(longurl)
	beego.Info(urlmd5)
	if urllist.IsExist(urlmd5) {
		result.UrlShort = urllist.Get(urlmd5).(string)
	} else {
		result.UrlShort = models.Generate()
		err := urllist.Put(urlmd5, result.UrlShort, 0)
		if err != nil {
			beego.Info(err)
		}
		err = urllist.Put(result.UrlShort, longurl, 0)
		if err != nil {
			beego.Info(err)
		}
	}
	this.Data["json"] = result
	this.ServeJson()
}
To use cache, you need to initialize a beego.NewBeeCache object and set expired time, and enable expired check. Then you can use following methods to achieve other operations:
- Get(name string) interface{}
- Put(name string, value interface{}, expired int) error
- Delete(name string) (ok bool, err error)
- IsExist(name string) bool
Safe map
We know that map is not thread safe in Go, if you don't know it, this article may be helpful for you: atomic_maps. However, we need a kind of thread safe map in practice, especially when we are using goroutines. Therefore, Beego provides a simple built-in thread safe map implementation.
bm := NewBeeMap()
if !bm.Set("astaxie", 1) {
	t.Error("set Error")
}
if !bm.Check("astaxie") {
	t.Error("check err")
}

if v := bm.Get("astaxie"); v.(int) != 1 {
	t.Error("get err")
}

bm.Delete("astaxie")
if bm.Check("astaxie") {
	t.Error("delete err")
}
This map has following interfaces:
- Get(k interface{}) interface{}
- Set(k interface{}, v interface{}) bool
- Check(k interface{}) bool
- Delete(k interface{})
Log
Beego has a default BeeLogger object that outputs log into stdout, and you can use your own logger as well:
beego.SetLogger(*log.Logger)
Now Beego supports new way to record your log with automatically log rotate. Use following code in your main function:
filew := beego.NewFileWriter("tmp/log.log", true)
err := filew.StartLogger()
if err != nil {
	beego.Critical("NewFileWriter err", err)
}
So Beego records your log into file tmp/log.log, the second argument indicates whether enable log rotate or not. The rules of rotate as follows:
- segment log every 1,000,000 lines.
- segment log every 256 MB file size.
- segment log daily.
- save log file up to 7 days as default.
You cannot segment log over 999 times everyday, the segmented file name with format <defined file name>.<date>.<three digits>.
You are able to modify rotate rules with following methods, be sure that you call them before StartLogger().
- func (w *FileLogWriter) SetRotateDaily(daily bool) *FileLogWriter
- func (w *FileLogWriter) SetRotateLines(maxlines int) *FileLogWriter
- func (w *FileLogWriter) SetRotateMaxDays(maxdays int64) *FileLogWriter
- func (w *FileLogWriter) SetRotateSize(maxsize int) *FileLogWriter
Different levels of log
- Trace(v ...interface{})
- Debug(v ...interface{})
- Info(v ...interface{})
- Warn(v ...interface{})
- Error(v ...interface{})
- Critical(v ...interface{})
You can use following code to set log level:
beego.SetLevel(beego.LevelError)
Your project may have a lot of log outputs, but you don't want to output everything after your application is running on the internet, for example, you want to ignore Trace, Debug and Info level log outputs, you can use following setting:
beego.SetLevel(beego.LevelWarning)
Then Beego will not output log that has lower level of LevelWarning. Here is the list of all log levels, order from lower to higher:
LevelTrace, LevelDebug, LevelInfo, LevelWarning, LevelError, LevelCritical
You can use different log level to output different error messages, it's based on how critical the error you think it is:
Examples of log messages
-
Trace
- "Entered parse function validation block"
- "Validation: entered second 'if'"
- "Dictionary 'Dict' is empty. Using default value"
-
Debug
- "Web page requested: http://somesite.com Params='...'"
- "Response generated. Response size: 10000. Sending."
- "New file received. Type:PNG Size:20000"
-
Info
- "Web server restarted"
- "Hourly statistics: Requested pages: 12345 Errors: 123 ..."
- "Service paused. Waiting for 'resume' call"
-
Warn
- "Cache corrupted for file='test.file'. Reading from back-end"
- "Database 192.168.0.7/DB not responding. Using backup 192.168.0.8/DB"
- "No response from statistics server. Statistics not sent"
-
Error
- "Internal error. Cannot process request #12345 Error:...."
- "Cannot perform login: credentials DB not responding"
-
Critical
- "Critical panic received: .... Shutting down"
- "Fatal error: ... App is shutting down to prevent data corruption or loss"
Example
func internalCalculationFunc(x, y int) (result int, err error) {
	beego.Debug("calculating z. x:",x," y:",y)
	z := y
	switch {
	case x == 3 :
		beego.Trace("x == 3")
		panic("Failure.")
	case y == 1 :
		beego.Trace("y == 1")
		return 0, errors.New("Error!")
	case y == 2 :
		beego.Trace("y == 2")
		z = x
	default :
		beego.Trace("default")
		z += x
	}
	retVal := z-3
	beego.Debug("Returning ", retVal)

	return retVal, nil
}

func processInput(input inputData) {
	defer func() {
		if r := recover(); r != nil {
			beego.Error("Unexpected error occurred: ", r)
			outputs <- outputData{result : 0, error : true}
		}
	}()
	beego.Info("Received input signal. x:",input.x," y:", input.y)

	res, err := internalCalculationFunc(input.x, input.y)
	if err != nil {
		beego.Warn("Error in calculation:", err.Error())
	}

	beego.Info("Returning result: ",res," error: ",err)
	outputs <- outputData{result : res, error : err != nil}
}

func main() {
	inputs = make(chan inputData)
	outputs = make(chan outputData)
	criticalChan = make(chan int)
	beego.Info("App started.")

	go consumeResults(outputs)
	beego.Info("Started receiving results.")

	go generateInputs(inputs)
	beego.Info("Started sending signals.")

	for {
		select {
			case input := <- inputs:
				processInput(input)
			case <- criticalChan:
				beego.Critical("Caught value from criticalChan: Go shut down.")
				panic("Shut down due to critical fault.")
		}
	}
}
Configuration
Beego supports to parse .ini file in path conf/app.conf, and you have following options:
appname = beepkg
httpaddr = "127.0.0.1"
httpport = 9090
runmode ="dev"
autorender = false
autorecover = false
viewspath = "myview"
If you set value in configuration file, Beego uses it to replace default value.
You can also have other values for your application, for example, database connection information:
mysqluser = "root"
mysqlpass = "rootpass"
mysqlurls = "127.0.0.1"
mysqldb   = "beego"
Then use following code to load your settings:
beego.AppConfig.String("mysqluser")
beego.AppConfig.String("mysqlpass")
beego.AppConfig.String("mysqlurls")
beego.AppConfig.String("mysqldb")
AppConfig supports following methods:
- Bool(key string) (bool, error)
- Int(key string) (int, error)
- Int64(key string) (int64, error)
- Float(key string) (float64, error)
- String(key string) string
Beego arguments
Beego has many configurable arguments, let me introduce to you all of them, so you can use them for more usage in your application:
-
BeeApp
Entry point of Beego, it initialized in init() function when you import Beego package.
-
AppConfig
It stores values from file
conf/app.confand initialized in init() function. -
HttpAddr
Application listening address, default is empty for listening all IP.
-
HttpPort
Application listening port, default is 8080.
-
AppName
Application name, default is "beego".
-
RunMode
Application mode, default is "dev" develop mode and gives friendly error messages.
-
AutoRender
This value indicates whether auto-render or not, default is true, you should set to false for API usage applications.
-
RecoverPanic
This value indicates whether recover from panic or not, default is true, and program will not exit when error occurs.
-
PprofOn
This value indicates whether enable pprof or not, default is false, and you can use following address to see goroutine execution status once you enable this feature.
  /debug/pprof
  /debug/pprof/cmdline
  /debug/pprof/profile
  /debug/pprof/symbol
For more information about pprof, please read pprof
-
ViewsPath
Template path, default is "views".
-
SessionOn
This value indicate whether enable session or not, default is false.
-
SessionProvider
Session engine, default is memory.
-
SessionName
Name for cookie that save in client browser, default is "beegosessionID".
-
SessionGCMaxLifetime
Session expired time, default is 3600 seconds.
-
SessionSavePath
Save path of session, default is empty.
-
UseFcgi
This value indicates whether enable fastcgi or not, default is false.
-
MaxMemory
Maximum memory size for file upload, default is
1 << 26(64M). -
EnableGzip
This value indicate whether enable gzip or not, default is false.
Integrated third-party applications
Beego supports to integrate third-party application, you can customized http.Handler as follows:
beego.RouterHandler("/chat/:info(.*)", sockjshandler)
sockjshandler implemented interface http.Handler.
Beego has an example for supporting chat of sockjs, here is the code:
package main

import (
	"fmt"
	"github.com/astaxie/beego"
	"github.com/fzzy/sockjs-go/sockjs"
	"strings"
)

var users *sockjs.SessionPool = sockjs.NewSessionPool()

func chatHandler(s sockjs.Session) {
	users.Add(s)
	defer users.Remove(s)

	for {
		m := s.Receive()
		if m == nil {
			break
		}
		fullAddr := s.Info().RemoteAddr
		addr := fullAddr[:strings.LastIndex(fullAddr, ":")]
		m = []byte(fmt.Sprintf("%s: %s", addr, m))
		users.Broadcast(m)
	}
}

type MainController struct {
	beego.Controller
}

func (m *MainController) Get() {
	m.TplNames = "index.html"
}

func main() {
	conf := sockjs.NewConfig()
	sockjshandler := sockjs.NewHandler("/chat", chatHandler, conf)
	beego.Router("/", &MainController{})
	beego.RouterHandler("/chat/:info(.*)", sockjshandler)
	beego.Run()
}
The above example implemented a simple chat room for sockjs, and you can use http.Handler for more extensions.
Deployment
Go compiles program to binary file, you only need to copy this binary to your server and run it. Because Beego uses MVC model, so you may have folders for static files, configuration files and template files, so you have to copy those files as well. Here is a real example for deployment.
$ mkdir /opt/app/beepkg
$ cp beepkg /opt/app/beepkg
$ cp -fr views /opt/app/beepkg
$ cp -fr static /opt/app/beepkg
$ cp -fr conf /opt/app/beepkg
Here is the directory structure pf /opt/app/beepkg.
.
├── conf
│   ├── app.conf
├── static
│   ├── css
│   ├── img
│   └── js
└── views
    └── index.tpl
├── beepkg
Now you can run your application in server, here are two good ways to manage your applications, and I recommend the first one.
-
Supervisord
More information: Supervisord
-
nohup
nohup ./beepkg &