31 KiB
Quick start
Hey, you say you've never heard about Beego and don't know how to use it? Don't worry, after you read this section, you will know a lot about Beego. Before you start reading, make sure you installed Beego in your computer, if not, check this tutorial: Installation
Navigation
- Hello world
- New project
- Development mode
- Router
- Static files
- Filter and middleware
- Controller
- Template
- Handle request
- Redirect and error
- Handle response
- Sessions
- Cache
- Safe map
- Log
- Configuration
- Beego arguments
- Integrated third-party applications
- Deployment
Hello world
This is an example of "Hello world" in Beego:
package main

import (
	"github.com/astaxie/beego"
)

type MainController struct {
	beego.Controller
}

func (this *MainController) Get() {
	this.Ctx.WriteString("hello world")
}

func main() {
	beego.Router("/", &MainController{})
	beego.Run()
}
Save file as "hello.go", build and run it:
$ go build main.go
$ ./hello
Open address http://127.0.0.1:8080 in your browser and you will see "hello world".
What happened in behind above example?
- We import package
github.com/astaxie/beego. As we know that Go initialize packages and runs init() function in every package(more detail here), so Beego initializes the BeeApp application at this time. - Define controller. We define a struct called
MainControllerwith a anonymous fieldbeego.Controller, so theMainControllerhas all methods thatbeego.Controllerhas. - Define RESTful methods. Once we use anonymous combination,
MainControllerhas already hadGet,Post,Delete,Putand other methods, these methods will be called when user sends corresponding request, likePostmethod for requests that are using POST method. Therefore, after we overloadedGetmethod inMainController, all GET requests will useGetmethod inMainControllerinstead of inbeego.Controller. - Define main function. All applications in Go use main function as entry point as C does.
- Register routers, it tells Beego which controller is responsibility for specific requests. Here we register
/forMainController, so all requests in/will be handed toMainController. Be aware that the first argument is the path and the second one is pointer of controller that you want to register. - Run application in port 8080 as default, press
Ctrl+cto exit.
New project
Get into your $GOPATH, then use following command to setup Beego project:
bee create hello
It generates folders and files for your project, directory structure as follows:
.
├── conf
│   └── app.conf
├── controllers
│   └── default.go
├── main.go
├── models
├── static
│   ├── css
│   ├── img
│   └── js
└── views
    └── index.tpl
Development mode
Beego uses development mode as default, you can use following code to change mode in your application:
beego.RunMode = "pro"
Or use configuration file in conf/app.conf, and input following content:
runmode = pro
No differences between two ways.
In development mode, you have following effects:
-
If you don't have directory
views, it prints following error prompt:2013/04/13 19:36:17 [W] [stat views: no such file or directory] -
It doesn't cache template and reload every time.
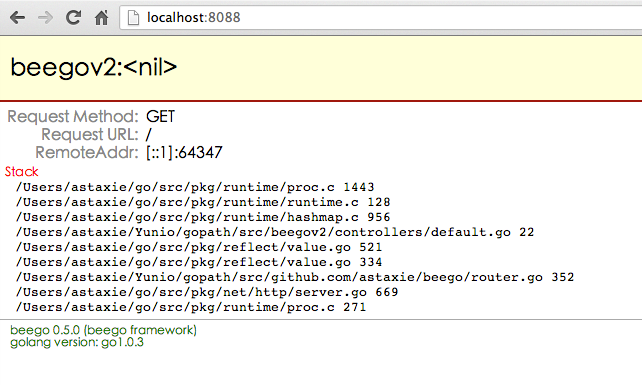
-
If panic occurs in your server, it prints information like following screen shot:
Router
The main function of router is to connect request URL and handler. Beego wrapped Controller, so it connects request URL and ControllerInterface. The ControllerInterface has following methods:
type ControllerInterface interface {
	Init(ct *Context, cn string)
	Prepare()
	Get()
	Post()
	Delete()
	Put()
	Head()
	Patch()
	Options()
	Finish()
	Render() error
}
beego.Controller implemented all of them, so you just use this struct as anonymous field in your controller struct. Of course you have to overload corresponding methods for more specific usages.
Users can use following ways to register route rules:
beego.Router("/", &controllers.MainController{})
beego.Router("/admin", &admin.UserController{})
beego.Router("/admin/index", &admin.ArticleController{})
beego.Router("/admin/addpkg", &admin.AddController{})
For more convenient configure route rules, Beego references the idea from sinatra, so it supports more kinds of route rules as follows:
-
beego.Router("/api/:id([0-9]+)", &controllers.RController{})
Customized regular expression match // match /api/123 :id= 123 -
beego.Router("/news/:all", &controllers.RController{})
Match rest of all // match /news/path/to/123.html :all= path/to/123.html -
beego.Router("/user/:username([\w]+)", &controllers.RController{})
Regular expression // match /user/astaxie :username = astaxie -
beego.Router("/download/
*.*", &controllers.RController{})Wildcard character // match /download/file/api.xml :path= file/api :ext=xml -
beego.Router("/download/ceshi/
*", &controllers.RController{})wildcard character match rest of all // match /download/ceshi/file/api.json :splat=file/api.json -
beego.Router("/🆔int", &controllers.RController{})
Match type int // match :id is int type, Beego uses regular expression ([0-9]+) automatically -
beego.Router("/:hi:string", &controllers.RController{})
Match type string // match :hi is string type, Beego uses regular expression ([\w]+) automatically
##Static files
Go provides http.ServeFile for static files, Beego wrapped this function and use following way to register static file folder:
beego.SetStaticPath("/static","public")
- The first argument is the path of your URL.
- The second argument is the directory in your application path.
Beego supports multiple static file directories as follows:
beego.SetStaticPath("/images","images")
beego.SetStaticPath("/css","css")
beego.SetStaticPath("/js","js")
After you setting static directory, when users visit /images/login/login.png,Beego accesses images/login/login.png in related to your application directory. One more example, if users visit /static/img/logo.png, Beego accesses file public/img/logo.png.
##Filter and middleware Beego supports customized filter and middleware, such as security verification, force redirect, etc.
Here is an example of verify user name of all requests, check if it's admin.
var FilterUser = func(w http.ResponseWriter, r *http.Request) {
    if r.URL.User == nil || r.URL.User.Username() != "admin" {
        http.Error(w, "", http.StatusUnauthorized)
    }
}

beego.Filter(FilterUser)
You can also filter by arguments:
beego.Router("/:id([0-9]+)", &admin.EditController{})
beego.FilterParam("id", func(rw http.ResponseWriter, r *http.Request) {
    dosomething()
})
Filter by prefix is also available:
beego.FilterPrefixPath("/admin", func(rw http.ResponseWriter, r *http.Request) {
    dosomething()
})
##Controller
Use beego.controller as anonymous in your controller struct to implement the interface in Beego:
type xxxController struct {
    beego.Controller
}
beego.Controller implementedbeego.ControllerInterface, beego.ControllerInterface defined following methods:
-
Init(ct
*Context, cn string)Initialize context, controller's name, template's name, and container of template arguments
-
Prepare()
This is for expend usages, it executes before all the following methods. Users can overload this method for verification for example.
-
Get()
This method executes when client sends request as GET method, 403 as default status code. Users overload this method for customized handle process of GET method.
-
Post()
This method executes when client sends request as POST method, 403 as default status code. Users overload this method for customized handle process of POST method.
-
Delete()
This method executes when client sends request as DELETE method, 403 as default status code. Users overload this method for customized handle process of DELETE method.
-
Put()
This method executes when client sends request as PUT method, 403 as default status code. Users overload this method for customized handle process of PUT method.
-
Head()
This method executes when client sends request as HEAD method, 403 as default status code. Users overload this method for customized handle process of HEAD method.
-
Patch()
This method executes when client sends request as PATCH method, 403 as default status code. Users overload this method for customized handle process of PATCH method.
-
Options()
This method executes when client sends request as OPTIONS method, 403 as default status code. Users overload this method for customized handle process of OPTIONS method.
-
Finish()
This method executes after corresponding method finished, empty as default. User overload this method for more usages like close database, clean data, etc.
-
Render() error
This method is for rendering template, it executes automatically when you set beego.AutoRender to true.
Overload all methods for all customized logic processes, let's see an example:
type AddController struct {
    beego.Controller
}

func (this *AddController) Prepare() {

}

func (this *AddController) Get() {
	this.Data["content"] ="value"
    this.Layout = "admin/layout.html"
    this.TplNames = "admin/add.tpl"
}

func (this *AddController) Post() {
    pkgname := this.GetString("pkgname")
    content := this.GetString("content")
    pk := models.GetCruPkg(pkgname)
    if pk.Id == 0 {
        var pp models.PkgEntity
        pp.Pid = 0
        pp.Pathname = pkgname
        pp.Intro = pkgname
        models.InsertPkg(pp)
        pk = models.GetCruPkg(pkgname)
    }
    var at models.Article
    at.Pkgid = pk.Id
    at.Content = content
    models.InsertArticle(at)
    this.Ctx.Redirect(302, "/admin/index")
}
模板处理
模板目录
beego中默认的模板目录是views,用户可以把你的模板文件放到该目录下,beego会自动在该目录下的所有模板文件进行解析并缓存,开发模式下会每次重新解析,不做缓存。当然用户可以通过如下的方式改变模板的目录:
beego.ViewsPath = "/myviewpath"
自动渲染
beego中用户无需手动的调用渲染输出模板,beego会自动的在调用玩相应的method方法之后调用Render函数,当然如果你的应用是不需要模板输出的,那么你可以在配置文件或者在main.go中设置关闭自动渲染。
配置文件配置如下:
autorender = false
main.go文件中设置如下:
beego.AutoRender = false
模板数据
模板中的数据是通过在Controller中this.Data获取的,所以如果你想在模板中获取内容{{.Content}},那么你需要在Controller中如下设置:
this.Data["Context"] = "value"
模板名称
beego采用了Go语言内置的模板引擎,所有模板的语法和Go的一模一样,至于如何写模板文件,详细的请参考模板教程。
用户通过在Controller的对应方法中设置相应的模板名称,beego会自动的在viewpath目录下查询该文件并渲染,例如下面的设置,beego会在admin下面找add.tpl文件进行渲染:
this.TplNames = "admin/add.tpl"
我们看到上面的模板后缀名是tpl,beego默认情况下支持tpl和html后缀名的模板文件,如果你的后缀名不是这两种,请进行如下设置:
beego.AddTemplateExt("你文件的后缀名")
当你设置了自动渲染,然后在你的Controller中没有设置任何的TplNames,那么beego会自动设置你的模板文件如下:
c.TplNames = c.ChildName + "/" + c.Ctx.Request.Method + "." + c.TplExt
也就是你对应的Controller名字+请求方法名.模板后缀,也就是如果你的Controller名是AddController,请求方法是POST,默认的文件后缀是tpl,那么就会默认请求/viewpath/AddController/POST.tpl文件。
lauout设计
beego支持layout设计,例如你在管理系统中,其实整个的管理界面是固定的,支会变化中间的部分,那么你可以通过如下的设置:
this.Layout = "admin/layout.html"
this.TplNames = "admin/add.tpl"
在layout.html中你必须设置如下的变量:
{{.LayoutContent}}
beego就会首先解析TplNames指定的文件,获取内容赋值给LayoutContent,然后最后渲染layout.html文件。
目前采用首先把目录下所有的文件进行缓存,所以用户还可以通过类似这样的方式实现layout:
{{template "header.html"}}
处理逻辑
{{template "footer.html"}}
模板函数
beego支持用户定义模板函数,但是必须在beego.Run()调用之前,设置如下:
func hello(in string)(out string){
    out = in + "world"
    return
}

beego.AddFuncMap("hi",hello)
定义之后你就可以在模板中这样使用了:
{{.Content | hi}}
目前beego内置的模板函数有如下:
-
markdown
实现了把markdown文本转化为html信息,使用方法{{markdown .Content}}
-
dateformat
实现了时间的格式化,返回字符串,使用方法{{dateformat .Time "2006-01-02T15:04:05Z07:00"}}
-
date
实现了类似PHP的date函数,可以很方便的根据字符串返回时间,使用方法{{date .T "Y-m-d H:i:s"}}
-
compare
实现了比较两个对象的比较,如果相同返回true,否者false,使用方法{{compare .A .B}}
-
substr
实现了字符串的截取,支持中文截取的完美截取,使用方法{{substr .Str 0 30}}
-
html2str
实现了把html转化为字符串,剔除一些script、css之类的元素,返回纯文本信息,使用方法{{html2str .Htmlinfo}}
-
str2html
实现了把相应的字符串当作HTML来输出,不转义,使用方法{{str2html .Strhtml}}
-
htmlquote
实现了基本的html字符转义,使用方法{{htmlquote .quote}}
-
htmlunquote
实现了基本的反转移字符,使用方法{{htmlunquote .unquote}}
request处理
我们经常需要获取用户传递的数据,包括Get、POST等方式的请求,beego里面会自动解析这些数据,你可以通过如下方式获取数据
- GetString(key string) string
- GetInt(key string) (int64, error)
- GetBool(key string) (bool, error)
使用例子如下:
func (this *MainController) Post() {
	jsoninfo := this.GetString("jsoninfo")
	if jsoninfo == "" {
		this.Ctx.WriteString("jsoninfo is empty")
		return
	}
}
如果你需要的数据可能是其他类型的,例如是int类型而不是int64,那么你需要这样处理:
func (this *MainController) Post() {
	id := this.Input().Get("id")
	intid, err := strconv.Atoi(id)
}
更多其他的request的信息,用户可以通过this.Ctx.Request获取信息,关于该对象的属性和方法参考手册Request
文件上传
在beego中你可以很容易的处理文件上传,就是别忘记在你的form表单中增加这个属性enctype="multipart/form-data",否者你的浏览器不会传输你的上传文件。
文件上传之后一般是放在系统的内存里面,如果文件的size大于设置的缓存内存大小,那么就放在临时文件中,默认的缓存内存是64M,你可以通过如下来调整这个缓存内存大小:
beego.MaxMemory = 1<<22
或者在配置文件中通过如下设置
maxmemory = 1<<22
beego提供了两个很方便的方法来处理文件上传:
-
GetFile(key string) (multipart.File, *multipart.FileHeader, error)
该方法主要用于用户读取表单中的文件名
the_file,然后返回相应的信息,用户根据这些变量来处理文件上传:过滤、保存文件等。 -
SaveToFile(fromfile, tofile string) error
该方法是在GetFile的基础上实现了快速保存的功能
保存的代码例子如下:
func (this *MainController) Post() {
	this.SaveToFile("the_file","/var/www/uploads/uploaded_file.txt"")
}
JSON和XML输出
beego当初设计的时候就考虑了API功能的设计,而我们在设计API的时候经常是输出JSON或者XML数据,那么beego提供了这样的方式直接输出:
JSON数据直接输出,设置content-type为application/json:
func (this *AddController) Get() {
    mystruct := { ... }
    this.Data["json"] = &mystruct
    this.ServeJson()
}
XML数据直接输出,设置content-type为application/xml:
func (this *AddController) Get() {
    mystruct := { ... }
    this.Data["xml"]=&mystruct
    this.ServeXml()
}
跳转和错误
我们在做Web开发的时候,经常会遇到页面调整和错误处理,beego这这方面也进行了考虑,通过Redirect方法来进行跳转:
func (this *AddController) Get() {
   this.Redirect("/", 302)
}
@todo 错误处理还需要后期改进
response处理
response可能会有集中情况:
-
模板输出
模板输出上面模板介绍里面已经介绍,beego会在执行完相应的Controller里面的对应的Method之后输出到模板。
-
跳转
上一节介绍的跳转就是我们经常用到的页面之间的跳转
-
字符串输出
有些时候我们只是想输出相应的一个字符串,那么我们可以通过如下的代码实现
this.Ctx.WriteString("ok")
Sessions
beego内置了session模块,目前session模块支持的后端引擎包括memory、file、mysql、redis四中,用户也可以根据相应的interface实现自己的引擎。
beego中使用session相当方便,只要在main入口函数中设置如下:
beego.SessionOn = true
或者通过配置文件配置如下:
sessionon = true
通过这种方式就可以开启session,如何使用session,请看下面的例子:
func (this *MainController) Get() {
	v := this.GetSession("asta")
	if v == nil {
		this.SetSession("asta", int(1))
		this.Data["num"] = 0
	} else {
		this.SetSession("asta", v.(int)+1)
		this.Data["num"] = v.(int)
	}
	this.TplNames = "index.tpl"
}
上面的例子中我们知道session有几个方便的方法:
- SetSession(name string, value interface{})
- GetSession(name string) interface{}
- DelSession(name string)
session操作主要有设置session、获取session、删除session
当然你要可以通过下面的方式自己控制相应的逻辑这些逻辑:
sess:=this.StartSession()
defer sess.SessionRelease()
sess对象具有如下方法:
- sess.Set()
- sess.Get()
- sess.Delete()
- sess.SessionID()
但是我还是建议大家采用SetSession、GetSession、DelSession三个方法来操作,避免自己在操作的过程中资源没释放的问题。
关于Session模块使用中的一些参数设置:
-
SessionOn
设置是否开启Session,默认是false,配置文件对应的参数名:sessionon
-
SessionProvider
设置Session的引擎,默认是memory,目前支持还有file、mysql、redis等,配置文件对应的参数名:sessionprovider
-
SessionName
设置cookies的名字,Session默认是保存在用户的浏览器cookies里面的,默认名是beegosessionID,配置文件对应的参数名是:sessionname
-
SessionGCMaxLifetime
设置Session过期的时间,默认值是3600秒,配置文件对应的参数:sessiongcmaxlifetime
-
SessionSavePath
设置对应file、mysql、redis引擎的保存路径或者链接地址,默认值是空,配置文件对应的参数:sessionsavepath
当SessionProvider为file时,SessionSavePath是只保存文件的目录,如下所示:
beego.SessionProvider = "file"
beego.SessionSavePath = "./tmp"
当SessionProvider为mysql时,SessionSavePath是链接地址,采用go-sql-driver,如下所示:
beego.SessionProvider = "mysql"
beego.SessionSavePath = "username:password@protocol(address)/dbname?param=value"
当SessionProvider为redis时,SessionSavePath是redis的链接地址,采用了redigo,如下所示:
beego.SessionProvider = "redis"
beego.SessionSavePath = "127.0.0.1:6379"
Cache设置
beego内置了一个cache模块,实现了类似memcache的功能,缓存数据在内存中,主要的使用方法如下:
var (
	urllist *beego.BeeCache
)

func init() {
	urllist = beego.NewBeeCache()
	urllist.Every = 0 //不过期
	urllist.Start()
}

func (this *ShortController) Post() {
	var result ShortResult
	longurl := this.Input().Get("longurl")
	beego.Info(longurl)
	result.UrlLong = longurl
	urlmd5 := models.GetMD5(longurl)
	beego.Info(urlmd5)
	if urllist.IsExist(urlmd5) {
		result.UrlShort = urllist.Get(urlmd5).(string)
	} else {
		result.UrlShort = models.Generate()
		err := urllist.Put(urlmd5, result.UrlShort, 0)
		if err != nil {
			beego.Info(err)
		}
		err = urllist.Put(result.UrlShort, longurl, 0)
		if err != nil {
			beego.Info(err)
		}
	}
	this.Data["json"] = result
	this.ServeJson()
}
上面这个例子演示了如何使用beego的Cache模块,主要是通过beego.NewBeeCache初始化一个对象,然后设置过期时间,开启过期检测,在业务逻辑中就可以通过如下的接口进行增删改的操作:
- Get(name string) interface{}
- Put(name string, value interface{}, expired int) error
- Delete(name string) (ok bool, err error)
- IsExist(name string) bool
安全的Map
我们知道在Go语言里面map是非线程安全的,详细的atomic_maps。但是我们在平常的业务中经常需要用到线程安全的map,特别是在goroutine的情况下,所以beego内置了一个简单的线程安全的map:
bm := NewBeeMap()
if !bm.Set("astaxie", 1) {
	t.Error("set Error")
}
if !bm.Check("astaxie") {
	t.Error("check err")
}

if v := bm.Get("astaxie"); v.(int) != 1 {
	t.Error("get err")
}

bm.Delete("astaxie")
if bm.Check("astaxie") {
	t.Error("delete err")
}
上面演示了如何使用线程安全的Map,主要的接口有:
- Get(k interface{}) interface{}
- Set(k interface{}, v interface{}) bool
- Check(k interface{}) bool
- Delete(k interface{})
日志处理
beego默认有一个初始化的BeeLogger对象输出内容到stdout中,你可以通过如下的方式设置自己的输出:
beego.SetLogger(*log.Logger)
只要你的输出符合*log.Logger就可以,例如输出到文件:
fd,err := os.OpenFile("/var/log/beeapp/beeapp.log", os.O_RDWR|os.O_APPEND, 0644)
if err != nil {
    beego.Critical("openfile beeapp.log:", err)
    return
}
lg := log.New(fd, "", log.Ldate|log.Ltime)
beego.SetLogger(lg)
不同级别的log日志函数
- Trace(v ...interface{})
- Debug(v ...interface{})
- Info(v ...interface{})
- Warn(v ...interface{})
- Error(v ...interface{})
- Critical(v ...interface{})
你可以通过下面的方式设置不同的日志分级:
beego.SetLevel(beego.LevelError)
当你代码中有很多日志输出之后,如果想上线,但是你不想输出Trace、Debug、Info等信息,那么你可以设置如下:
beego.SetLevel(beego.LevelWarning)
这样的话就不会输出小于这个level的日志,日志的排序如下:
LevelTrace、LevelDebug、LevelInfo、LevelWarning、 LevelError、LevelCritical
用户可以根据不同的级别输出不同的错误信息,如下例子所示:
Examples of log messages
-
Trace
- "Entered parse function validation block"
- "Validation: entered second 'if'"
- "Dictionary 'Dict' is empty. Using default value"
-
Debug
- "Web page requested: http://somesite.com Params='...'"
- "Response generated. Response size: 10000. Sending."
- "New file received. Type:PNG Size:20000"
-
Info
- "Web server restarted"
- "Hourly statistics: Requested pages: 12345 Errors: 123 ..."
- "Service paused. Waiting for 'resume' call"
-
Warn
- "Cache corrupted for file='test.file'. Reading from back-end"
- "Database 192.168.0.7/DB not responding. Using backup 192.168.0.8/DB"
- "No response from statistics server. Statistics not sent"
-
Error
- "Internal error. Cannot process request #12345 Error:...."
- "Cannot perform login: credentials DB not responding"
-
Critical
- "Critical panic received: .... Shutting down"
- "Fatal error: ... App is shutting down to prevent data corruption or loss"
Example
func internalCalculationFunc(x, y int) (result int, err error) {
	beego.Debug("calculating z. x:",x," y:",y)
	z := y
	switch {
	case x == 3 :
		beego.Trace("x == 3")
		panic("Failure.")
	case y == 1 :
		beego.Trace("y == 1")
		return 0, errors.New("Error!")
	case y == 2 :
		beego.Trace("y == 2")
		z = x
	default :
		beego.Trace("default")
		z += x
	}
	retVal := z-3
	beego.Debug("Returning ", retVal)

	return retVal, nil
}

func processInput(input inputData) {
	defer func() {
		if r := recover(); r != nil {
            beego.Error("Unexpected error occurred: ", r)
			outputs <- outputData{result : 0, error : true}
        }
	}()
	beego.Info("Received input signal. x:",input.x," y:", input.y)

	res, err := internalCalculationFunc(input.x, input.y)
	if err != nil {
		beego.Warn("Error in calculation:", err.Error())
	}

	beego.Info("Returning result: ",res," error: ",err)
	outputs <- outputData{result : res, error : err != nil}
}

func main() {
	inputs = make(chan inputData)
	outputs = make(chan outputData)
	criticalChan = make(chan int)
	beego.Info("App started.")

	go consumeResults(outputs)
	beego.Info("Started receiving results.")

	go generateInputs(inputs)
	beego.Info("Started sending signals.")

	for {
		select {
			case input := <- inputs:
				processInput(input)
			case <- criticalChan:
				beego.Critical("Caught value from criticalChan: Go shut down.")
				panic("Shut down due to critical fault.")
		}
	}
}
配置管理
beego支持解析ini文件, beego默认会解析当前应用下的conf/app.conf文件
通过这个文件你可以初始化很多beego的默认参数
appname = beepkg
httpaddr = "127.0.0.1"
httpport = 9090
runmode ="dev"
autorender = false
autorecover = false
viewspath = "myview"
上面这些参数会替换beego默认的一些参数。
你可以在配置文件中配置应用需要用的一些配置信息,例如下面所示的数据库信息:
mysqluser = "root"
mysqlpass = "rootpass"
mysqlurls = "127.0.0.1"
mysqldb   = "beego"
那么你就可以通过如下的方式获取设置的配置信息:
beego.AppConfig.String("mysqluser")
beego.AppConfig.String("mysqlpass")
beego.AppConfig.String("mysqlurls")
beego.AppConfig.String("mysqldb")
AppConfig支持如下方法
- Bool(key string) (bool, error)
- Int(key string) (int, error)
- Int64(key string) (int64, error)
- Float(key string) (float64, error)
- String(key string) string
系统默认参数
beego中带有很多可配置的参数,我们来一一认识一下它们,这样有利于我们在接下来的beego开发中可以充分的发挥他们的作用:
-
BeeApp
beego默认启动的一个应用器入口,在应用import beego的时候,在init中已经初始化的。
-
AppConfig
beego的配置文件解析之后的对象,也是在init的时候初始化的,里面保存有解析
conf/app.conf下面所有的参数数据 -
HttpAddr
应用监听地址,默认为空,监听所有的网卡IP
-
HttpPort
应用监听端口,默认为8080
-
AppName
应用名称,默认是beego
-
RunMode
应用的模式,默认是dev,为开发模式,在开发模式下出错会提示友好的出错页面,如前面错误描述中所述。
-
AutoRender
是否模板自动渲染,默认值为true,对于API类型的应用,应用需要把该选项设置为false,不需要渲染模板。
-
RecoverPanic
是否异常恢复,默认值为true,即当应用出现异常的情况,通过recover恢复回来,而不会导致应用异常退出。
-
PprofOn
是否启用pprof,默认是false,当开启之后,用户可以通过如下地址查看相应的goroutine执行情况
/debug/pprof /debug/pprof/cmdline /debug/pprof/profile /debug/pprof/symbol关于pprof的信息,请参考官方的描述pprof
-
ViewsPath
模板路径,默认值是views
-
SessionOn
session是否开启,默认是false
-
SessionProvider
session的引擎,默认是memory
-
SessionName
存在客户端的cookie名称,默认值是beegosessionID
-
SessionGCMaxLifetime
session过期时间,默认值是3600秒
-
SessionSavePath
session保存路径,默认是空
-
UseFcgi
是否启用fastcgi,默认是false
-
MaxMemory
文件上传默认内存缓存大小,默认值是
1 << 26(64M)
第三方应用集成
beego支持第三方应用的集成,用户可以自定义http.Handler,用户可以通过如下方式进行注册路由:
beego.RouterHandler("/chat/:info(.*)", sockjshandler)
sockjshandler实现了接口http.Handler。
目前在beego的example中有支持sockjs的chat例子,示例代码如下:
package main

import (
	"fmt"
	"github.com/astaxie/beego"
	"github.com/fzzy/sockjs-go/sockjs"
	"strings"
)

var users *sockjs.SessionPool = sockjs.NewSessionPool()

func chatHandler(s sockjs.Session) {
	users.Add(s)
	defer users.Remove(s)

	for {
		m := s.Receive()
		if m == nil {
			break
		}
		fullAddr := s.Info().RemoteAddr
		addr := fullAddr[:strings.LastIndex(fullAddr, ":")]
		m = []byte(fmt.Sprintf("%s: %s", addr, m))
		users.Broadcast(m)
	}
}

type MainController struct {
	beego.Controller
}

func (m *MainController) Get() {
	m.TplNames = "index.html"
}

func main() {
	conf := sockjs.NewConfig()
	sockjshandler := sockjs.NewHandler("/chat", chatHandler, conf)
	beego.Router("/", &MainController{})
	beego.RouterHandler("/chat/:info(.*)", sockjshandler)
	beego.Run()
}
通过上面的代码很简单的实现了一个多人的聊天室。上面这个只是一个sockjs的例子,我想通过大家自定义http.Handler,可以有很多种方式来进行扩展beego应用。
部署编译应用
Go语言的应用最后编译之后是一个二进制文件,你只需要copy这个应用到服务器上,运行起来就行。beego由于带有几个静态文件、配置文件、模板文件三个目录,所以用户部署的时候需要同时copy这三个目录到相应的部署应用之下,下面以我实际的应用部署为例:
$ mkdir /opt/app/beepkg
$ cp beepkg /opt/app/beepkg
$ cp -fr views /opt/app/beepkg
$ cp -fr static /opt/app/beepkg
$ cp -fr conf /opt/app/beepkg
这样在/opt/app/beepkg目录下面就会显示如下的目录结构:
.
├── conf
│   ├── app.conf
├── static
│   ├── css
│   ├── img
│   └── js
└── views
    └── index.tpl
├── beepkg
这样我们就已经把我们需要的应用搬到服务器了,那么接下来就可以开始部署了,我现在服务器端用两种方式来run,
-
Supervisord
安装和配置见Supervisord
-
nohup方式
nohup ./beepkg &
个人比较推荐第一种方式,可以很好的管理起来应用